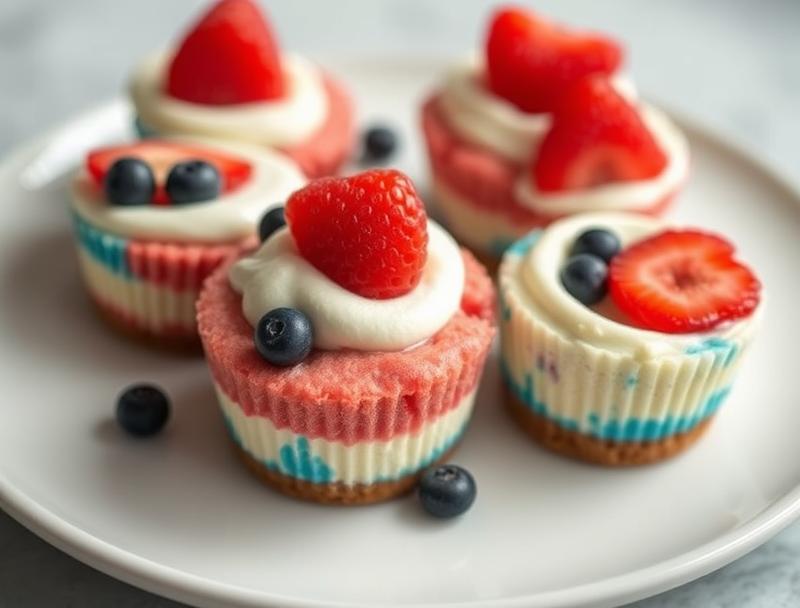
Red, White, and Blue Mini Cheesecake Cups
Introduction
Imagine a dessert that’s as patriotic as it is delicious, easy to make, and perfect for any summer gathering or Independence Day celebration. Look no further than these Red, White, and Blue Mini Cheesecake Cups. This recipe combines the richness of cheesecake with the vibrant colors of strawberries, blueberries, and whipped cream, all in bite-sized portions that are sure to impress your friends and family. The best part? It’s incredibly easy to make and requires minimal special equipment, making it accessible to bakers of all skill levels.
Why This Works
- Flavor balance and ingredient accessibility: The combination of creamy cheesecake, sweet strawberries, and tangy blueberries creates a perfectly balanced flavor profile that’s both familiar and exciting. Plus, all the ingredients are easily found in most supermarkets.
- Ease of preparation: Despite their elegant appearance, these mini cheesecakes are surprisingly simple to prepare. The crust is made from straightforward graham cracker crumbs, and the cheesecake filling requires just a few common ingredients.
- Impressive results with minimal effort: One of the best things about this recipe is how impressive the results are compared to the amount of effort you put in. Your guests will be amazed by the colorful, layered effect of the cheesecakes, and you’ll enjoy the satisfaction of having created something truly special without slaving away in the kitchen.
Ingredients
- 1 1/2 cups graham cracker crumbs
- 1/4 cup granulated sugar
- 6 tablespoons (3/4 stick) unsalted butter, melted
- 12 ounces cream cheese, softened
- 1/2 cup granulated sugar
- 2 large eggs
- 1 teaspoon vanilla extract
- 1 cup sour cream
- 1 cup heavy cream
- 1 cup sliced strawberries
- 1 cup fresh blueberries
- Whipped cream, for serving
Instructions
- Step 1: Prepare the Crust – Preheat your oven to 325°F (165°C). In a medium bowl, mix together the graham cracker crumbs, sugar, and melted butter until well combined. Press about 1 tablespoon of the mixture into the bottom of each mini muffin tin cup. Bake for 5 minutes, then let cool completely.
- Step 2: Make the Cheesecake Filling – In a large mixing bowl, beat the cream cheese until smooth. Add the granulated sugar and beat until combined. Beat in the eggs one at a time, followed by the vanilla extract. Stir in the sour cream and heavy cream until smooth.
- Step 3: Fill and Bake the Cheesecakes – Divide the cheesecake batter evenly among the prepared muffin tin cups. Bake for 15-18 minutes, or until the edges are set and the centers are just slightly jiggly. Let cool completely in the pan.
- Step 4: Assemble and Chill – Once the cheesecakes are cool, top each one with a slice of strawberry and a few blueberries. Cover the muffin tin with plastic wrap and refrigerate for at least 4 hours or overnight. Just before serving, top with whipped cream.
Handy Tips
- For a more intense blueberry flavor, you can use blueberry jam or preserves as an alternative topping.
- Make sure to not overmix the cheesecake batter, as this can lead to a dense texture.
- If you’re not serving the cheesecakes immediately, you can prepare them up to a day in advance and store them in the refrigerator.
Heat Control
When baking the crust and the cheesecakes, it’s crucial to keep an eye on the temperature and timing. The oven should be preheated to 325°F (165°C), and the baking time should be closely monitored to avoid overcooking. The crust should be lightly browned after 5 minutes, and the cheesecakes should be set at the edges and slightly jiggly in the center after 15-18 minutes.
Crunch Factor
The crunch in these mini cheesecakes comes from the graham cracker crust. To achieve the perfect crunch, make sure the crust is baked until it’s lightly browned and set. This provides a nice textural contrast to the smooth cheesecake and the soft fruit on top.
Pro Kitchen Tricks
- Use room temperature ingredients for the cheesecake batter to ensure it mixes smoothly and evenly.
- Don’t open the oven door during the baking time, as this can cause the cheesecakes to sink or not cook evenly.
- For a clean release from the muffin tin, make sure the cheesecakes are completely cooled, then run a knife around the edges of each cup before lifting them out.
Storage Tips
- These mini cheesecakes can be stored in an airtight container in the refrigerator for up to 3 days.
- For longer storage, they can be frozen for up to 2 months. Simply thaw in the refrigerator overnight before serving.
- When storing, it’s best to keep the cheesecakes without the whipped cream topping. Add the whipped cream just before serving for the best texture and appearance.
Gift Packaging Ideas
These Red, White, and Blue Mini Cheesecake Cups are perfect for gifting, especially around patriotic holidays. Consider packaging them in decorative muffin tin liners or small gift boxes. You can also add a personal touch with a handwritten note or a small American flag pick. For a more rustic look, wrap each cheesecake in parchment paper and tie with a ribbon.
Flavor Variations
- Try using different types of fruit, such as raspberries or blackberries, for a unique flavor twist.
- Add a teaspoon of lemon or orange zest to the cheesecake batter for an extra burst of citrus flavor.
- For a chocolate version, melt 1/4 cup of chocolate chips and swirl them into the cheesecake batter before baking.
Troubleshooting
- If your cheesecakes crack, it might be due to overmixing the batter or baking them at too high a temperature. Try reducing the oven temperature or mixing the batter just until the ingredients are combined.
- If the crust doesn’t set properly, check that you’ve used the right amount of melted butter and that the oven is at the correct temperature.
- If the cheesecakes are too dense, it could be because the batter was overmixed or the cheesecakes were overbaked. Adjust your mixing and baking times accordingly.
FAQs
- Can I freeze the cheesecakes? Yes, you can freeze them for up to 2 months. Thaw in the refrigerator overnight before serving.
- Is this recipe gluten-free? The graham cracker crust contains gluten, but you can substitute it with a gluten-free alternative if needed.
- Can I double the recipe? Yes, you can easily double the recipe to make more cheesecakes. Just keep an eye on the baking time, as it might be slightly longer for a larger batch.
Conclusion
With these Red, White, and Blue Mini Cheesecake Cups, you’ll have a dessert that’s not only delicious but also visually stunning and perfectly themed for any patriotic celebration. The combination of creamy cheesecake, crunchy graham cracker crust, and sweet strawberries and blueberries is a winner, and the fact that they’re so easy to make is just the icing on the cake. Or should we say, the whipped cream on the cheesecake? Whatever the occasion, these mini cheesecakes are sure to be a hit, and with the tips and variations provided, you’ll be well on your way to creating your own signature dessert.
Red, White, and Blue Mini Cheesecake Cups
Patriotic mini cheesecakes with a graham cracker crust, creamy cheesecake filling, and topped with strawberries, blueberries, and whipped cream.
🥘 Ingredients
👩🍳 Instructions
-
1Preheat oven to 325°F (165°C).
-
2Prepare the graham cracker crust and press into mini muffin tin cups.
-
3Bake the crust for 5 minutes and let cool.
-
4Make the cheesecake filling and divide among the muffin tin cups.
-
5Bake the cheesecakes for 15-18 minutes and let cool completely.
-
6Top with strawberries, blueberries, and whipped cream before serving.